Nail it: DIY manicure hacks
When it comes to nail care, sometimes a trip to the salon is just not in the cards. Whether it's due to time constraints, budget limitations, or simply a desire to try out your own skills, DIY manicures can be a great option. With a few simple hacks, you can achieve salon-quality nails at home.
One of the first things to consider when attempting a DIY manicure is the tools you'll need. Investing in a good quality nail file, cuticle pusher, and buffer can make all the difference. These tools will help you shape and smooth your nails, creating a polished and professional look.
Another important step in achieving a flawless manicure is properly prepping your nails. Start by removing any old polish and gently pushing back your cuticles. This will give you a clean canvas to work with and help your polish adhere better. Additionally, applying a base coat can help protect your nails and prevent staining.
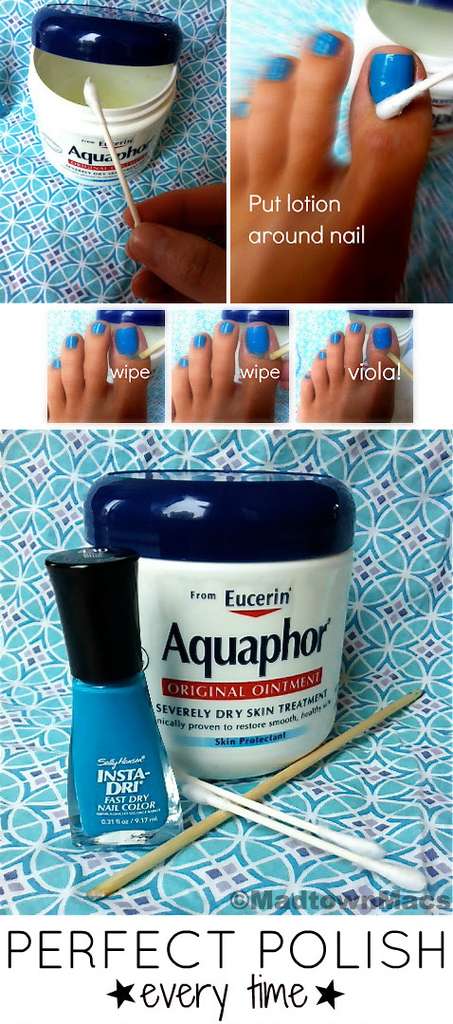
When it comes to applying polish, practice makes perfect. Start with thin coats, allowing each one to dry fully before applying the next. This will help prevent streaks and smudges. If you do make a mistake, don't worry - a cotton swab dipped in nail polish remover can quickly clean up any mishaps.
Lastly, don't forget to finish off your DIY manicure with a top coat. This will help seal in your polish and give your nails a beautiful, glossy finish. Plus, it can extend the wear of your polish, ensuring your manicure lasts as long as possible.
With these simple hacks, you can master the art of the DIY manicure and have beautiful nails without ever leaving your home.
Nail Care Basics

1.Keep your nails clean
Proper nail care starts with keeping your nails clean. Use a nail brush and warm soapy water to remove any dirt or debris from your nails and cuticles. Remember to dry your nails thoroughly to prevent any moisture-related issues.
2. Moisturize your nails
Moisturizing your nails is essential for keeping them healthy and preventing breakage. Apply a nourishing cuticle oil or cream regularly to keep your nails and cuticles hydrated. Massage the product into your nails and cuticles to improve blood circulation and promote healthy nail growth.
3. Trim and shape your nails
Regularly trim and shape your nails to maintain a neat and clean appearance. Use a sharp nail clipper or scissors to trim your nails, and a nail file to shape them. Avoid filing in a back-and-forth motion, as this can weaken your nails. Instead, file in one direction to prevent splitting and peeling.
4. Avoid using your nails as tools
Using your nails as tools, such as opening cans or picking at surfaces, can cause damage and weaken your nails. Always use proper tools and avoid putting unnecessary pressure on your nails to prevent breakage and peeling.
5. Protect your nails
Protect your nails from harsh chemicals and excessive water exposure. Wear gloves while doing household chores or using cleaning products to prevent your nails from becoming weak and brittle. Also, avoid exposing your nails to excessive moisture, as this can lead to fungal infections.
6. Eat a balanced diet
A balanced diet plays a crucial role in maintaining healthy nails. Include foods rich in vitamins, minerals, and proteins, such as fruits, vegetables, lean meats, and whole grains, in your diet. These nutrients will promote strong and healthy nail growth.
7. Avoid harsh nail treatments
Avoid harsh nail treatments, such as excessive buffing, acrylic or gel nail extensions, and harsh nail polishes. These can weaken your nails and make them more susceptible to breakage and damage.Opt for gentler nail treatments and give your nails regular breaks to recover.
By following these nail care basics, you can keep your nails healthy, strong, and beautiful. Remember to be gentle with your nails and give them the care they deserve to ensure long-lasting nail health.
Preparing Your Nails

Before you start your DIY manicure, it's important to prepare your nails properly. This will ensure a smooth and long-lasting manicure.
1. Remove any old nail polish
Begin by removing any old nail polish from your nails. Use a non-acetone nail polish remover to avoid drying out your nails. Gently press the cotton pad onto your nail and hold it for a few seconds before wiping away the polish.
2. Trim and shape your nails
Next, trim your nails to your desired length using a nail clipper. Be sure to cut straight across and avoid cutting too short, as this can cause pain and discomfort. After trimming, use a nail file to shape your nails. File in one direction and avoid using a sawing motion, as this can weaken the nails.
3. Push back your cuticles
Gently push back your cuticles using a cuticle pusher or orangewood stick. This will create a clean and polished look for your manicure. Be careful not to cut or trim your cuticles, as they serve as a protective barrier for your nails.
4. Buff your nails
Use a nail buffer to gently buff the surface of your nails. This will smooth out any ridges or imperfections, creating a smooth canvas for your nail polish. Be careful not to buff too aggressively, as this can thin out the nails.
By following these steps, you'll be well-prepared to start your DIY manicure. This will result in a professional-looking finish that will last longer and keep your nails healthy.
Choosing the Right Colors and Designs

When it comes to DIY manicures, choosing the right colors and designs is key to achieving a professional-looking result. One of the first things to consider is the color palette.It's important to choose colors that complement your skin tone and personal style. Warmer skin tones tend to look best with shades of red, orange, and pink, while cooler skin tones can pull off blues, purples, and greens.
Once you have chosen a color palette, you can start thinking about the nail art designs. There are endless possibilities when it comes to nail art, from simple patterns and geometric shapes to intricate designs and nail decals. If you're new to nail art, it's a good idea to start with simpler designs and gradually work your way up to more complex ones.
When selecting a design, it's important to consider the occasion and your personal taste. For everyday wear, you may prefer more subtle and understated designs, such as a classic French manicure or a single accent nail. On the other hand, for special occasions or parties, you can go bold and opt for eye-catching designs like glitter ombre, animal prints, or floral patterns.
Remember, experimenting with different colors and designs is part of the fun of DIY manicures. Don't be afraid to try out new combinations and get creative with your nail art. And if you're ever in doubt, there are plenty of online tutorials and inspiration boards that can help guide you in choosing the perfect colors and designs for your DIY manicure.
Applying Nail Polish Like a Pro

Getting a salon-like manicure at home is easier than you might think. With a few simple tricks, you can apply nail polish like a pro and achieve a flawless finish.
Prep and Cleanse
Before applying nail polish, it's important to prep your nails. Start by filing them into your desired shape. Push back your cuticles gently using a cuticle pusher or an orangewood stick. Then, cleanse your nails with a nail polish remover to remove any oils or residues that could prevent the polish from adhering properly.
Apply a Base Coat
An essential step to achieving a professional-looking manicure is applying a base coat.This creates a smooth surface for the polish and helps it last longer. Apply a thin layer of base coat to each nail and let it dry completely before moving on to the next step.
Apply the Polish
When applying the polish, start with a thin coat and work your way up to a thicker one if needed. Use even strokes from the base of your nail to the tip, making sure to cover the entire nail surface. If you make any mistakes, don't worry! You can easily clean them up later using a small brush dipped in nail polish remover.
Seal with a Top Coat
To prolong the life of your manicure and give it a glossy finish, apply a top coat. This will help protect your nails from chipping and add extra shine. Apply a thin layer of top coat over the dried polish, making sure to seal the edges of your nails as well.
Remember to let each layer dry completely before applying the next one and be patient during the process. With these simple steps, you'll be able to apply nail polish like a pro and enjoy a stunning DIY manicure.
Tips for Long-Lasting Results

1. Prep your nails
Before applying any nail polish, it's important to prep your nails properly. Start by removing any old polish and filing your nails into your desired shape. Next, gently push back your cuticles using a cuticle pusher or an orange stick. This will help create a clean canvas for your manicure and ensure that the polish adheres well to your nails.
2. Use a base coat
Applying a base coat is a key step in achieving a long-lasting manicure. A base coat not only helps to protect your nails from staining but also creates a smooth surface for the polish to adhere to. Choose a base coat that suits your needs, whether it's a strengthening formula or a hydrating one.
3. Thin layers are key
When applying nail polish, it's better to use thin layers rather than thick ones. Thin layers dry faster and are less likely to smudge or chip. Apply two thin coats of polish, waiting for each coat to dry before applying the next.This will ensure a smooth and even color payoff.
4. Seal it with a top coat
To lock in your manicure and make it last longer, always finish with a top coat. A top coat not only adds shine but also provides an extra layer of protection against chips and fading. Look for a fast-drying top coat that will help speed up the drying process and prolong the life of your manicure.
5. Take care of your hands
Proper hand care is essential for maintaining a long-lasting manicure. Avoid activities that can easily chip or damage your nails, such as washing dishes without gloves or using your nails to open packages. Moisturize your hands and cuticles regularly to keep them healthy and hydrated.
By following these tips, you can achieve a professional-looking manicure that lasts for days. Remember to take your time, be gentle with your nails, and experiment with different colors and finishes to find your perfect DIY manicure.


